
Upgrade Your Entrance: How to Install Brass Door Hinges Yourself
When it comes to upgrading the aesthetics and functionality of your home, even the smallest details can make a significant difference. One such detail that often goes unnoticed but can enhance the overall appeal of your entrance is the door hinges. While often overlooked, door hinges play a crucial role in ensuring smooth operation and security of your doors. Upgrading to brass door hinges not only adds a touch of elegance but also offers durability and reliability.
In this comprehensive guide, we'll walk you through the step-by-step process of installing brass door hinges yourself. From the tools and materials you'll need to helpful hints for a seamless installation, you'll learn everything you need to know to elevate your entrance.
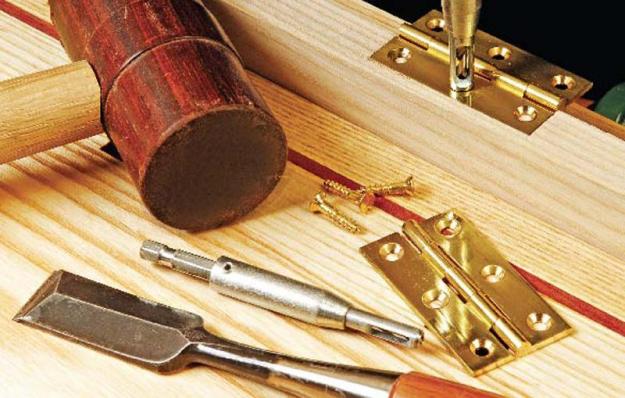
Tools and Materials

Before you begin the installation process, gather the necessary tools and materials to ensure a smooth workflow. Here's what you'll need:
Brass door hinges (appropriate size for your door)
Screwdriver (manual or power)
Chisel
Utility knife
Drill with a suitable drill bit
Tape measure
Pencil
Wood screws
Safety goggles
Dust mask (optional)
Sandpaper (optional, for finishing touches)
Step 1: Place the Brass Hinges on the Door

The first step in installing brass door hinges is to position them on the edge of the door where they will be installed. This initial placement sets the foundation for the entire installation process.
Using a tape measure and pencil, carefully mark the locations where you intend to place the hinges. It's crucial to ensure precise alignment and spacing to achieve optimal functionality and aesthetic appeal. Typically, hinges are positioned at the top, middle, and bottom of the door to provide balanced support and stability.
When marking the hinge locations, consider the dimensions of the door and the weight it will bear. For heavier doors, additional hinges may be necessary to distribute the weight evenly and prevent sagging over time.
Once you've marked the hinge locations, place the brass hinges on the door, aligning them with the markings. Take your time to ensure that the hinges are positioned accurately and evenly along the edge of the door.
As you position the hinges, envision how the door will swing open and closed once the installation is complete. This foresight will help you determine the most suitable placement for the hinges to ensure smooth operation and clearance from adjacent surfaces.
Step 2: Cut out the Mortise

After placing the brass hinges on the door, the next step is to cut out the mortise for each hinge. The mortise is a recessed area in the edge of the door where the hinge will sit flush with the surface.
To cut the mortise, use a combination of a chisel and utility knife. Begin by scoring the outline of the mortise with the utility knife, following the markings you made earlier. This helps create clean edges and prevents splintering of the wood.
Next, use the chisel to carefully remove the wood within the scored outline. Take your time and work slowly, making shallow cuts at first and gradually increasing the depth as needed. The mortise should be deep enough to accommodate the entire hinge leaf, allowing it to sit flush with the surface of the door.
Be sure to check the fit of the hinge periodically as you work, adjusting the depth of the mortise as necessary to achieve a snug fit. It's essential to make clean and precise cuts, as any irregularities or rough edges can affect the functionality and appearance of the hinges once installed.
Step 3: Mark the Location of the Screws

Once the mortises are cut, mark the locations of the screw holes on both the door and the door frame. Use a pencil to make these markings, ensuring they align accurately with the screw holes on the hinges.
Step 4: Drill the Pilot Holes

Using a drill with an appropriate drill bit, drill pilot holes at the marked screw locations on both the door and the door frame. Pilot holes help prevent splitting of the wood and make it easier to drive the screws in later.
Step 5: Install the Hinge on the Door

Once the pilot holes are drilled, reposition the brass hinges on the door, aligning them with the mortises you've created. Secure the hinges in place by driving wood screws through the pilot holes and into the door. Use a screwdriver to tighten the screws securely, ensuring that the hinges are firmly attached. This step is crucial for ensuring that the hinges provide proper support and stability to the door, allowing it to open and close smoothly without any issues.
Step 6: Attach the Hinge to the Door Frame

Next, position the door frame side of the hinges against the door frame, aligning them with the corresponding mortises. Once aligned, drive wood screws through the pilot holes into the door frame to secure the hinges in place. Again, ensure the screws are tightened securely to provide adequate support.
Step 7: Test the Door
With the hinges installed, test the door to ensure smooth operation. Open and close the door several times to check for any resistance or misalignment. If necessary, make adjustments to the hinges or mortises to achieve proper functionality.
Helpful Hints for Installing Door Hinges

Take accurate measurements: Precision is key when installing door hinges. Take your time to measure and mark the locations of the hinges and screw holes to ensure proper alignment.
Use sharp tools: Sharp chisels and utility knives make it easier to cut clean mortises, resulting in a professional-looking installation.
Pre-drill pilot holes: Pre-drilling pilot holes prevents wood from splitting and makes it easier to drive screws into hardwoods or dense materials.
Check for smooth operation: Before finishing the installation, test the door to ensure it opens and closes smoothly without any resistance or binding.
Ensure even spacing: Maintain consistent spacing between hinges for a balanced and aesthetically pleasing look. Use a tape measure to ensure equal distances between hinges and the door edges.
Verify hinge orientation: Ensure that all hinges are installed in the correct orientation, with the knuckles facing in the same direction. This ensures proper function and prevents binding.
Use lubrication: Apply a small amount of lubricant to the hinge pins to ensure smooth operation of the hinges over time. This helps prevent squeaking and prolongs the lifespan of the hinges.
Test alignment: After installing the hinges, check for any misalignment by slowly opening and closing the door. Adjust the hinges as needed to ensure proper alignment and clearance.
Conclusion
Upgrading your entrance with brass door hinges is a simple yet effective way to enhance the overall aesthetic and functionality of your home. By following the step-by-step guide outlined above and incorporating helpful hints for a seamless installation, you can achieve professional-looking results without the need for professional help. So, roll up your sleeves, gather your tools, and embark on this DIY project to elevate your entrance and make a lasting impression.


