

Step-by-Step: How to Install 3.5 Inch Square Corner Hinges
Hinges are fundamental components in the realm of carpentry and home improvement. They serve as the pivot point for doors, cabinets, and various other fixtures, facilitating smooth movement and functionality. Among the different types available, square corner hinges are widely used due to their versatility and ease of installation. In this comprehensive guide, we will walk you through the step-by-step process of installing 3.5-inch square corner hinges, enabling you to enhance the functionality and aesthetics of your doors and cabinets with confidence.
Step 1: Gather the Necessary Tools and Materials

Before you embark on the installation of 3.5-inch square corner hinges, it's crucial to ensure that you have all the required tools and materials within reach. Having everything prepared beforehand will streamline the installation process and prevent unnecessary interruptions. Here's a comprehensive list of the tools and materials you'll need:
Tools:
- Screwdriver (Phillips or flat-head, depending on the type of screws provided with the hinges)
- Measuring tape
- Pencil
- Utility knife or chisel (if creating hinge mortises)
- Drill and drill bits (if pre-drilling holes is necessary)
- Hammer (if you encounter stubborn screws or need to tap the hinges into place)
- Level (to ensure the door or cabinet is properly aligned)
- Safety goggles (to protect your eyes during drilling or chiseling)
Materials:
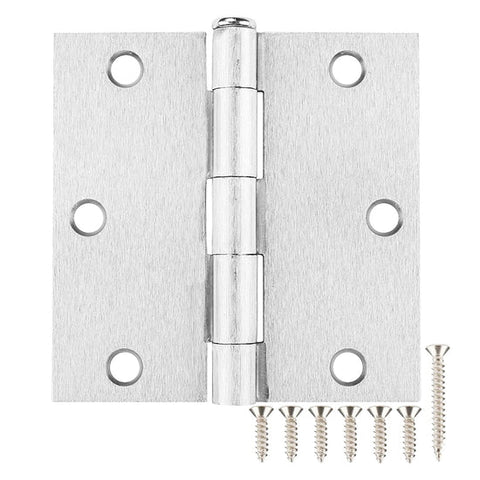
- 3.5-inch square corner hinges (quantity as per the number of hinges needed)
- Screws (usually provided with the hinges, but have extras on hand just in case)
- Door or cabinet (to which the hinges will be attached)
- Sandpaper (optional, for smoothing rough edges or surfaces)
- Wood putty or filler (optional, for filling in gaps or holes if necessary)
- Paint or stain (optional, for finishing the hinges to match the door or cabinet)
By ensuring you have all the necessary tools and materials gathered before you begin, you'll be well-equipped to tackle the installation process efficiently and effectively. This proactive approach will help you avoid delays and frustrations, allowing you to achieve professional-quality results with confidence. Once you've gathered everything on the list, you're ready to move on to the next step: preparing the door or cabinet for hinge installation.
Step 2: Prepare the Door or Cabinet

Begin by laying the door or cabinet flat on a stable surface, ensuring it is clean and free of any obstructions. If the door or cabinet already has existing hinges, remove them carefully using a screwdriver. Next, determine the placement of the new hinges on the door or cabinet. For optimal functionality, hinges are typically installed at the top, bottom, and middle of the door or cabinet. Use a measuring tape and pencil to mark the desired locations for the hinges.
Step 3: Mark the Hinge Locations

Using the measurements obtained in the previous step, mark the hinge locations on the door or cabinet. Place the hinge flat against the edge of the door or cabinet, ensuring that it is positioned correctly and aligns with the markings. Use a pencil to trace around the perimeter of the hinge, creating an outline of its shape on the surface. Repeat this process for each hinge location.
Step 4: Prepare the Hinge Mortises (Optional)

If you prefer a flush installation where the hinges are recessed into the surface of the door or cabinet, you'll need to create hinge mortises. To do this, use a utility knife or chisel to carefully carve out shallow recesses within the outlines drawn in the previous step. Take your time and work slowly to ensure precision and avoid damaging the surface of the door or cabinet. Once the mortises are complete, test-fit the hinges to ensure they sit flush with the surface.
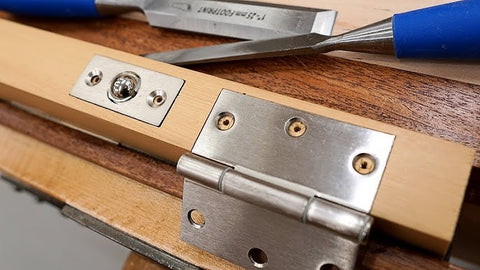
Step 5: Attach the Hinges to the Door or Cabinet

With the hinge locations marked and prepared, it's time to attach the hinges to the door or cabinet. Position the hinge over the outlined area, ensuring that the square corners align with the edges of the door or cabinet. Using a screwdriver, insert the provided screws through the mounting holes on the hinge and into the surface of the door or cabinet. Start by loosely tightening the screws to hold the hinge in place, then go back and fully tighten them once all screws are inserted.
Step 6: Align the Hinge Leaves
Once the hinges are securely attached to the door or cabinet, it's important to ensure that the hinge leaves are properly aligned for smooth operation. Open and close the door or cabinet several times to check for any misalignment or binding. If necessary, adjust the position of the hinges slightly to achieve optimal alignment. This may require loosening the screws slightly, repositioning the hinge, and then tightening the screws again.
Step 7: Attach the Door or Cabinet to the Frame

With the hinges securely installed on the door or cabinet, it's time to attach the other half of the hinge to the door frame or cabinet frame. Position the door or cabinet in its intended location, ensuring that it is properly aligned within the frame. Hold the door or cabinet in place while using a screwdriver to attach the hinges to the frame using the provided screws. Start by loosely tightening the screws, then adjust the position of the door or cabinet as needed before fully tightening the screws.
Step 8: Test the Movement and Alignment
Once the door or cabinet is attached to the frame, test its movement to ensure smooth operation. Open and close the door or cabinet several times, checking for any sticking, binding, or misalignment issues. If necessary, make minor adjustments to the hinge positions or tighten any loose screws to correct the problem. Continue testing until you are satisfied with the movement and alignment of the door or cabinet.
Step 9: Final Checks and Adjustments
Before considering the installation complete, take a final look at the hinges, door, and frame to ensure everything is in order. Check for any loose screws or signs of misalignment, and make any necessary adjustments to address these issues. Once you are confident that everything is secure and properly aligned, your installation is complete!
Conclusion
Installing 3.5-inch square corner hinges is a straightforward process that can greatly enhance the functionality and appearance of your doors and cabinets. By following the step-by-step guide outlined above and exercising care and precision throughout the installation process, you can achieve professional-quality results with ease. Whether you're embarking on a DIY home improvement project or working as a professional carpenter, mastering the art of hinge installation is a valuable skill that will serve you well in various applications.


