

Easy Fixes for Common 4-Inch Radius Corner Door Hinge Problems
Door hinges are often the unsung heroes of our homes, quietly supporting the constant opening and closing of doors without much fuss. However, when something goes wrong with these small but vital components, it can quickly become a nuisance. One common type of hinge found in many homes is the 4-inch radius corner door hinge. While these hinges are generally reliable, they can encounter issues over time. Fortunately, many of these problems have simple solutions that homeowners can implement without needing professional assistance. In this guide, we'll explore some of the most common issues with 4-inch radius corner door hinges and provide easy fixes to restore functionality to your doors.
Squeaking Hinges
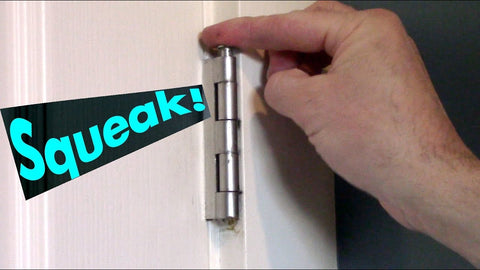
Squeaking hinges are one of the most common annoyances homeowners face. That telltale creak every time you open or close a door can grate on your nerves and disrupt the peace of your home. Fortunately, resolving this issue is often simpler than you might think. Here's a guide on how to silence those squeaky hinges once and for all.
Assess the Situation: Before you jump into fixing the squeak, it's essential to identify which hinge is causing the problem. Open and close the door slowly while listening carefully to pinpoint the source of the noise. Once you've identified the squeaky hinge, you can proceed with the necessary steps to remedy the issue.
Clean the Hinge: Over time, hinges can accumulate dust, dirt, and grime, which can exacerbate squeaking. Start by cleaning the hinge thoroughly using a rag or brush. Pay close attention to the areas around the hinge pins and joints where dirt tends to accumulate. Removing this buildup may eliminate the squeak altogether.
Apply Lubricant: Lubrication is key to reducing friction and eliminating squeaks in hinges. Once the hinge is clean and dry, apply a small amount of lubricant to the hinge pins and joints. There are various lubricants you can use for this purpose, including WD-40, silicone spray, or even household oils like vegetable oil or olive oil. Be sure to apply the lubricant sparingly to avoid creating a mess.
Work the Hinge: After applying lubricant, work the hinge back and forth several times to help distribute the lubricant evenly and work it into the joints. This action helps to loosen any stuck parts and ensures smooth operation. You should notice a significant reduction in squeaking as you move the door.
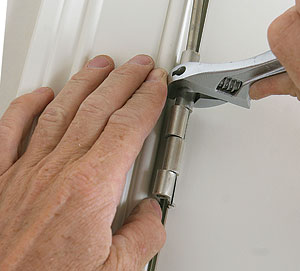
Tighten Loose Screws: Loose screws can contribute to hinge squeaking by allowing excessive movement and friction. Inspect the screws securing the hinge to the door frame and tighten any that are loose using a screwdriver. Be careful not to overtighten the screws, as this could strip the screw holes or damage the hinge.
Consider Hinge Replacement: If you've tried cleaning and lubricating the hinge and tightening loose screws but the squeak persists, it may be time to consider replacing the hinge altogether. Over time, hinges can wear out or become damaged, leading to persistent squeaking. Replacement hinges are widely available at hardware stores and are relatively easy to install with basic tools.
Preventive Maintenance: To prevent future squeaks, make it a habit to periodically clean and lubricate your door hinges as part of your home maintenance routine. Regular maintenance can help prolong the life of your hinges and ensure smooth operation for years to come.
Loose Hinges

Loose hinges are a common issue that many homeowners encounter. They can cause doors to sag, stick, or make noise when opening and closing. However, tightening loose hinges is a relatively simple task that can restore proper function to your doors. Here's a step-by-step guide on how to tighten loose hinges and fix the problem:
Identify the Loose Hinge: Start by inspecting all the hinges on the door to determine which one is loose. Open and close the door a few times while paying attention to any movement or wobbling in the hinges. Once you've identified the loose hinge, you can proceed with tightening it.
Gather the Necessary Tools: To tighten the loose hinge, you'll need a screwdriver that matches the type of screws used in your hinges. Most door hinges use Phillips head screws, but some may have flathead screws instead. Make sure you have the appropriate screwdriver on hand before you begin.
Tighten the Screws: Using the screwdriver, tighten the screws on the loose hinge by turning them clockwise. Start with the screws on the door leaf (the part of the hinge attached to the door) and then move on to the screws on the jamb leaf (the part attached to the door frame). Tighten each screw a little at a time, alternating between screws to ensure even pressure.
Check for Proper Alignment: After tightening the screws, check the alignment of the door to ensure that it opens and closes smoothly. If the door still sticks or binds, the hinge may need further adjustment. You can adjust the position of the hinge by loosening the screws slightly and tapping the hinge with a hammer to shift its position. Once the hinge is properly aligned, tighten the screws again to secure it in place.
Test the Door: Open and close the door several times to test for any remaining issues. Pay attention to how the door moves and whether there are any signs of looseness or wobbling in the hinges. If the door operates smoothly and there are no signs of movement in the hinges, then you've successfully tightened the loose hinge.
Consider Reinforcement: If you find that the screw holes in the door or door frame have become stripped or enlarged, you may need to reinforce them to ensure a secure fit. One way to do this is by filling the holes with wooden toothpicks or matchsticks dipped in wood glue. Once the glue dries, you can reinsert the screws into the reinforced holes for a tighter hold.
Regular Maintenance: To prevent hinges from becoming loose in the future, it's a good idea to perform regular maintenance on your doors and hinges. Check the screws periodically to ensure they're tight, and lubricate the hinges with a silicone-based lubricant to keep them operating smoothly.
Binding or Sticking Doors
Binding or sticking doors are common problems that can be caused by various factors, including changes in humidity, settling of the house, or misaligned hinges. When a door binds or sticks, it can be frustrating to open and close, and it can even cause damage to the door or door frame if left unaddressed. Here's a guide on how to fix binding or sticking doors:
Identify the Problem Area: Start by determining where the door is binding or sticking. Open and close the door slowly, paying attention to where it catches or rubs against the door frame. Note any areas where there is resistance or difficulty moving the door.
Check Hinges for Misalignment: Misaligned hinges are a common cause of binding or sticking doors. Inspect the hinges on the door and door frame to ensure they are properly aligned. If you notice any gaps between the hinges or if they appear crooked, they may need to be adjusted.
Adjust Hinge Position: To adjust the position of the hinges, loosen the screws that hold them in place just enough to allow for movement. Use a hammer and a block of wood to gently tap the hinge up or down, left or right, depending on where the door is binding. Make small adjustments until the door operates smoothly.
Check for Shims: Sometimes, builders use shims to ensure that door frames are level and plumb during installation. If the door is binding at the top or bottom, check for shims between the door frame and the wall studs. Remove any excess shims or add shims as needed to adjust the position of the door frame.
Sand or Plane the Door: If the door is binding along its edges, you may need to sand or plane the affected areas to create more clearance. Use a coarse-grit sandpaper or a hand plane to remove small amounts of material from the edges of the door until it fits properly in the frame. Be sure to sand or plane evenly to maintain a smooth, flush surface.
Lubricate the Hinges: Lubricating the hinges can help reduce friction and make it easier for the door to move smoothly. Apply a small amount of silicone-based lubricant to the hinge pins and joints, then open and close the door several times to distribute the lubricant evenly.
Test the Door: After making adjustments, test the door to ensure that it opens and closes smoothly without binding or sticking. If necessary, make further adjustments until the door operates correctly.
Address Additional Issues: If the door continues to bind or stick despite your efforts, there may be other underlying issues, such as warped door frames or settling of the house. In such cases, it may be necessary to consult a professional contractor or carpenter for further assistance.
Hinge Pin Removal

Removing hinge pins is a necessary task for various reasons, whether you're painting your door, replacing the hinges, or performing maintenance. However, hinge pins can sometimes be stubborn and difficult to remove. Here's a step-by-step guide on how to remove hinge pins with ease:
Gather Your Tools: Before you begin, make sure you have all the necessary tools on hand. You'll need a hammer, a nail punch or a screwdriver with a flat head, and possibly a pair of pliers.
Position Yourself Properly: Stand on the side of the door where the hinge pins are accessible. It's often easier to remove hinge pins with the door partially open, so position the door accordingly.
Inspect the Hinge Pins: Take a close look at the hinge pins to identify any obstructions or damage that may hinder removal. If there's rust, corrosion, or paint buildup on the pins, you may need to address these issues before attempting to remove them.
Tap the Bottom of the Hinge Pin: Using a hammer and a nail punch or a screwdriver, gently tap the bottom of the hinge pin upward. The goal is to create upward force on the pin to gradually loosen it from the hinge knuckles.
Apply Penetrating Oil (if needed): If the hinge pins are particularly stubborn, you can apply a small amount of penetrating oil, such as WD-40 or PB Blaster, to help loosen them. Allow the oil to penetrate for a few minutes before attempting to remove the pin again.
Tap the Pin Alternately: As you continue tapping on the bottom of the hinge pin, you may need to alternate between hinges if your door has multiple hinges. This helps to distribute the force evenly and prevent the pin from becoming wedged.
Use Pliers (if necessary): If the hinge pin still won't budge, you can use a pair of pliers to grip the pin and apply additional force while tapping it with the hammer. Be careful not to damage the pin or the surrounding hinge knuckles.
Remove the Pin Completely: Once the hinge pin starts to move upward, continue tapping it until it's completely removed from the hinge knuckles. You may need to catch the pin as it comes out to prevent it from falling to the ground.
Repeat for Each Hinge Pin: If your door has multiple hinge pins, repeat the same process for each one until they're all removed. Take your time and be patient, as removing hinge pins can sometimes require a bit of effort.
Clean and Lubricate the Hinges (optional): Once the hinge pins are removed, take the opportunity to clean the hinge knuckles and lubricate them with a silicone-based lubricant. This will help ensure smooth operation when you reinstall the hinge pins.
Conclusion
While 4-inch radius corner door hinges are generally reliable, they can encounter issues over time that require attention. By following the simple fixes outlined in this guide, you can address common hinge problems and restore functionality to your doors without the need for professional assistance. Remember to regularly inspect and maintain your door hinges to prevent issues from occurring and ensure smooth operation for years to come. With a little bit of care and maintenance, your door hinges can continue to serve their purpose effectively, keeping your doors swinging smoothly day after day.


